今回は、TerraformでNLBのターゲットにALBを登録した環境を構築しました。
<補足>
2021年9月27日、NLBのターゲットにALBを登録することができるようになっています。
参考:https://aws.amazon.com/jp/about-aws/whats-new/2021/09/application-load-balancer-aws-privatelink-static-ip-addresses-network-load-balancer/
Terraformは上記のアップデートに対応済みです。
参考:https://registry.terraform.io/providers/hashicorp/aws/latest/docs/resources/lb_target_group
target_type – (May be required, Forces new resource) Type of target that you must specify when registering targets with this target group. See doc for supported values. The default is instance.
→Terraform公式ドキュメントに、AWS公式ドキュメント内にあるパラメータ(ターゲットタイプがALB)が使えますよ、という旨が記述されています。
構成図
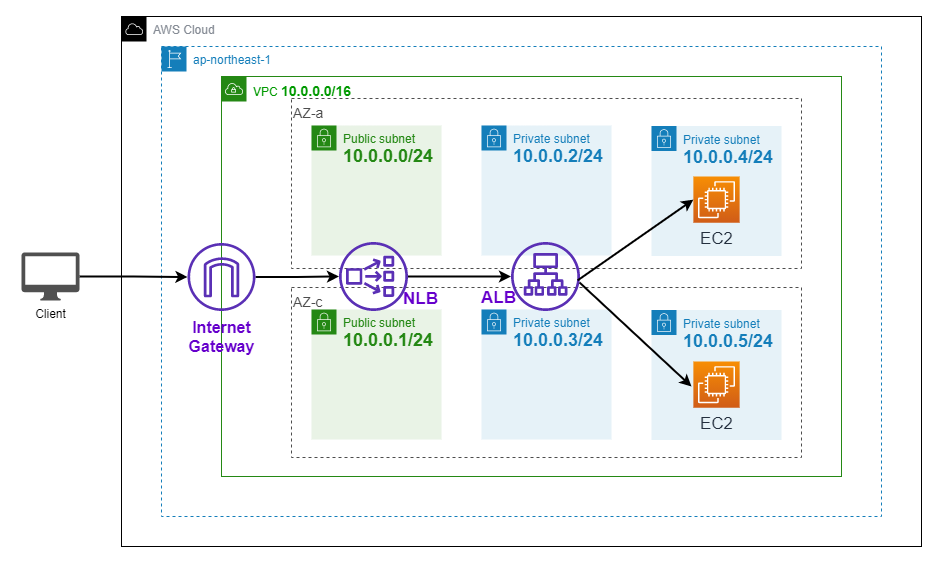
構成図は以下です。
パブリックサブネットのNLB→プライベートサブネットのALB→プライベートサブネットのEC2インスタンス(Webサーバー)の構成です。
tfファイルの内容
今回はtfファイルを3つに分けました。
各tfファイルの概要は以下です。
| ファイル名 | 概要 |
| infra.tf | VPCやサブネット、セキュリティグループ等のインフラを構築 |
| ec2.tf | ALBのターゲットとなるWebサーバー用EC2を構築 |
| elb.tf | ALB、NLBを構築 |
infra.tf
ALB用セキュリティグループのインバウンドは便宜上、0.0.0.0/0 としています。
上記のIPアドレスを絞る場合は、NLBを配置しているサブネットではなく、クライアント(実際にHTTPのリクエストを出す端末)のCIDRを許可する必要があります。
メタ引数である「for_each」の使い方については、以下の記事でご紹介しています。
【Terraform】3AZ分のサブネットを1つの定義で構築してみた
############################################################################
# VPC
############################################################################
resource "aws_vpc" "vpc" {
  cidr_block = "10.0.0.0/16"

  tags = {
    Name = "test-vpc"
  }
}

############################################################################
# インターネットゲートウェイ
############################################################################
resource "aws_internet_gateway" "igw" {
  vpc_id = aws_vpc.vpc.id
  tags = {
    Name = "test-igw"
  }
}

############################################################################
# サブネット
############################################################################
# NLB用パブリックサブネット
resource "aws_subnet" "nlb_subnet" {
  for_each = {
    "a" = "10.0.0.0/24"
    "c" = "10.0.1.0/24"
  }
  vpc_id            = aws_vpc.vpc.id
  cidr_block        = each.value
  availability_zone = "ap-northeast-1${each.key}"
  tags = {
    Name = "test-nlb-subnet-${each.key}"
  }
}

# ALB用プライベートサブネット
resource "aws_subnet" "alb_subnet" {
  for_each = {
    "a" = "10.0.2.0/24"
    "c" = "10.0.3.0/24"
  }
  vpc_id            = aws_vpc.vpc.id
  cidr_block        = each.value
  availability_zone = "ap-northeast-1${each.key}"
  tags = {
    Name = "test-alb-subnet-${each.key}"
  }
}

# EC2用プライベートサブネット
resource "aws_subnet" "ec2_subnet" {
  for_each = {
    "a" = "10.0.4.0/24"
    "c" = "10.0.5.0/24"
  }
  vpc_id            = aws_vpc.vpc.id
  cidr_block        = each.value
  availability_zone = "ap-northeast-1${each.key}"
  tags = {
    Name = "test-ec2-subnet-${each.key}"
  }
}

############################################################################
# ルートテーブル
############################################################################
resource "aws_route_table" "public_route" {
  vpc_id = aws_vpc.vpc.id
  route {
    gateway_id = aws_internet_gateway.igw.id
    cidr_block = "0.0.0.0/0"
  }
  tags = {
    Name = "test-public-route"
  }
}

# サブネットとの紐づけ
resource "aws_route_table_association" "route_public_association" {
  for_each = {
    "a" = "1"
    "c" = "2"
  }
  subnet_id      = aws_subnet.nlb_subnet["${each.key}"].id
  route_table_id = aws_route_table.public_route.id
}

############################################################################
# セキュリティグループ
############################################################################
# ALB用セキュリティグループ
resource "aws_security_group" "sg_alb" {
  name        = "test-sg-alb"
  description = "Allow http from NLB"
  vpc_id      = aws_vpc.vpc.id

  ingress {
    from_port = 80
    to_port   = 80
    protocol  = "tcp"
    cidr_blocks = [
      "0.0.0.0/0",
    ]
  }
  egress {
    cidr_blocks = [
      "0.0.0.0/0",
    ]
    from_port = 80
    protocol  = "tcp"
    to_port   = 80
  }
}

# EC2用セキュリティグループ
resource "aws_security_group" "sg_ec2" {
  name        = "test-sg-ec2"
  description = "Allow http from ALB"
  vpc_id      = aws_vpc.vpc.id
}

# EC2用セキュリティグループのインバウンドへALBのセキュリティグループをソースに指定
resource "aws_security_group_rule" "sg_ec2_rule" {
  type                     = "ingress"
  to_port                  = 80
  protocol                 = "tcp"
  source_security_group_id = aws_security_group.sg_alb.id
  from_port                = 80
  security_group_id        = aws_security_group.sg_ec2.id
}
ec2.tf
AMIは、事前にApacheをインストールして、「/var/www/html/index.html(中身はHello world」を作成したものを使用しています。
※プライベートなAMIであるためブランクとさせていただいています。
サブネットと同様、「for_each」でEC2インスタンスをまとめて2つ構築しています。
##############################################################################
# EC2インスタンス
##############################################################################
resource "aws_instance" "ec2" {
  for_each = {
    "a" = "1"
    "c" = "2"
  }
  ami                    = "ami-xxxxxxxxxxxxxxxxx"
  instance_type          = "t2.micro"
  subnet_id              = aws_subnet.ec2_subnet["${each.key}"].id
  vpc_security_group_ids = [aws_security_group.sg_ec2.id]
  tags = {
    Name = "test-ec2-${each.key}"
  }
}
elb.tf
NLBのターゲットグループ定義にて、属性「target_type」でALBを指定する事ができます。
NLBのターゲットグループへのターゲット紐づけ定義では、「target_id」にALBのARNを指定する必要があります。
############################################################################
# ELB
############################################################################
#---------------------------------------------------------------------------
# ALB
#---------------------------------------------------------------------------
# ALB本体
resource "aws_lb" "alb" {
  name               = "test-alb"
  internal           = true
  load_balancer_type = "application"
  security_groups    = [aws_security_group.sg_alb.id]
  subnets = [
    aws_subnet.alb_subnet["a"].id,
    aws_subnet.alb_subnet["c"].id
  ]
  tags = {
    Name = "test-alb"
  }
}

# ALBのターゲットグループ
resource "aws_lb_target_group" "tg_alb" {
  name     = "test-tg-alb"
  port     = 80
  protocol = "HTTP"
  vpc_id   = aws_vpc.vpc.id
}

# ALBのターゲットグループへのターゲットを紐づけ
resource "aws_lb_target_group_attachment" "tg_alb_attachment" {
  for_each = {
    "a" = "1"
    "c" = "2"
  }
  target_group_arn = aws_lb_target_group.tg_alb.arn
  target_id        = aws_instance.ec2["${each.key}"].id
}

# ALBのリスナー設定(ALBとターゲットグループの紐づけ)
resource "aws_lb_listener" "listener_alb" {
  load_balancer_arn = aws_lb.alb.arn
  port              = 80
  protocol          = "HTTP"
  default_action {
    type             = "forward"
    target_group_arn = aws_lb_target_group.tg_alb.arn
  }
}

#---------------------------------------------------------------------------
# NLB
#---------------------------------------------------------------------------
# NLB本体
resource "aws_lb" "nlb" {
  name               = "test-nlb"
  internal           = false
  load_balancer_type = "network"
  subnets = [
    aws_subnet.nlb_subnet["a"].id,
    aws_subnet.nlb_subnet["c"].id
  ]
  tags = {
    Name = "test-nlb"
  }
}

# NLBのターゲットグループ
resource "aws_lb_target_group" "tg_nlb" {
  name        = "test-tg-nlb"
  port        = 80
  protocol    = "TCP"
  vpc_id      = aws_vpc.vpc.id
  target_type = "alb"
}

# NLBのターゲットグループへのターゲット紐づけ
resource "aws_lb_target_group_attachment" "tg_nlb_attachment" {
  target_group_arn = aws_lb_target_group.tg_nlb.arn
  target_id        = aws_lb.alb.arn
  port             = 80
}

# NLBのリスナー設定(NLBとターゲットグループの紐づけ)
resource "aws_lb_listener" "listener_nlb" {
  load_balancer_arn = aws_lb.nlb.arn
  port              = 80
  protocol          = "TCP"
  default_action {
    type             = "forward"
    target_group_arn = aws_lb_target_group.tg_nlb.arn
  }
}
NLB→ALB→EC2の接続を確認する
上記の各tfファイルについて、terraform applyが完了したら、通信の疎通を確認します。
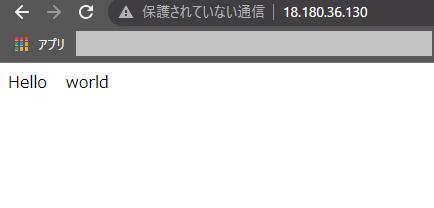
まず、構築した各ターゲットグループでステータスが「Healthy」であることを確認した上で、手元のブラウザでNLBのDNS名にアクセスします。

index.htmlの内容が表示され、無事接続できていることを確認できました。
参考情報
・AWS公式ドキュメント(NLBでALBの指定が可能に)
https://aws.amazon.com/jp/about-aws/whats-new/2021/09/application-load-balancer-aws-privatelink-static-ip-addresses-network-load-balancer/
・Terraform公式ドキュメント(LBのターゲットグループ定義)
https://registry.terraform.io/providers/hashicorp/aws/latest/docs/resources/lb_target_group
今回は、TerraformでNLBのターゲットにALBを登録した環境構築をご紹介しました。
この記事を通して、少しでもTerraform習得のお役に立てれば幸いです。
